

AdsPower is one of the most popular antidetect browsers on the market for several compelling reasons. In this article, we will discuss the key features that make this browser a top choice and guide you through the process of integrating proxies on AdsPower, whether single or bulk.
By the end of this article, you will be ready to configure your proxies in less than 20 minutes. Let’s go!
What is AdsPower?
AdsPower is an anti-detect browser that creates safe and isolated browsing environments for each online account, ensuring they are not blacklisted. This multi-login browser management tool is compatible with Mac and Windows operating systems.
In addition to its protection abilities, AdsPower offers numerous proxy connection protocols and allows you to select the preferred browser for your profile. You can use either Mozilla Firefox or Google Chrome. But there is even more to what this browser offers.
Some key features of this browser include multi-account management, a user-friendly interface, unique fingerprints, and automation. With its automation features, you can use Local API and RPA robots to automate your routine tasks, allowing you to focus on your business growth.
Before starting
Although we mentioned earlier that AdsPower is a top-tier option, enjoying its full range of features may require a subscription to a custom plan. Don’t worry; a free plan isn’t entirely bad. In fact, it offers lifetime access and meets many needs; however, it has a limitation: you must end one session to begin another.
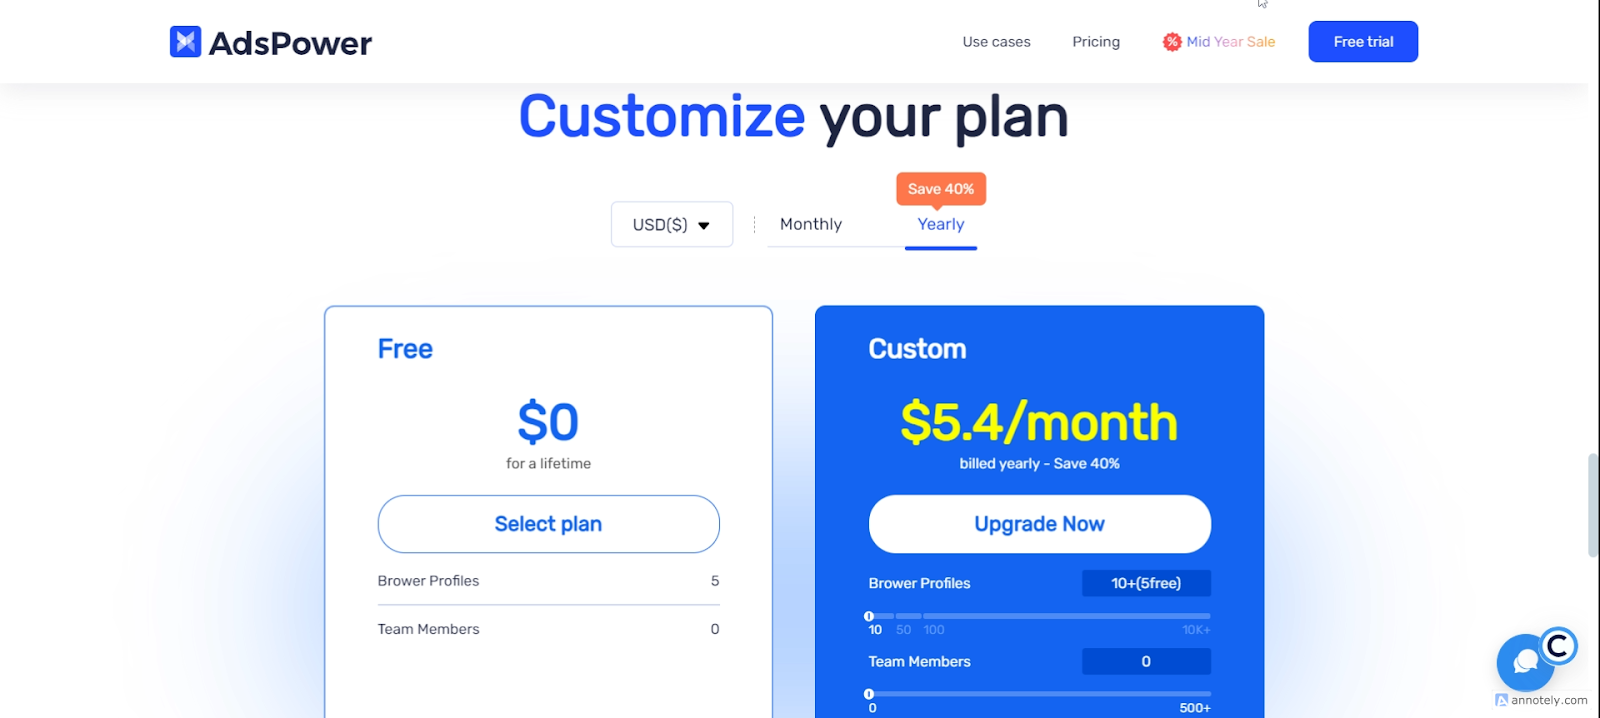
This might affect your workflow, so we suggest upgrading your plan on AdsPower. In addition, if you want to explore the limits of AdsPower, the first step is to create an active Webshare account.
Once you create a new Webshare account, you are awarded 10 premium proxies for free. Moreover, this offer does not need a coupon code or your credit card information. These complimentary proxies will get you started with your proxy integration!
How to set up a single proxy on AdsPower
To understand the process of configuring a single proxy on AdsPower, follow these steps:
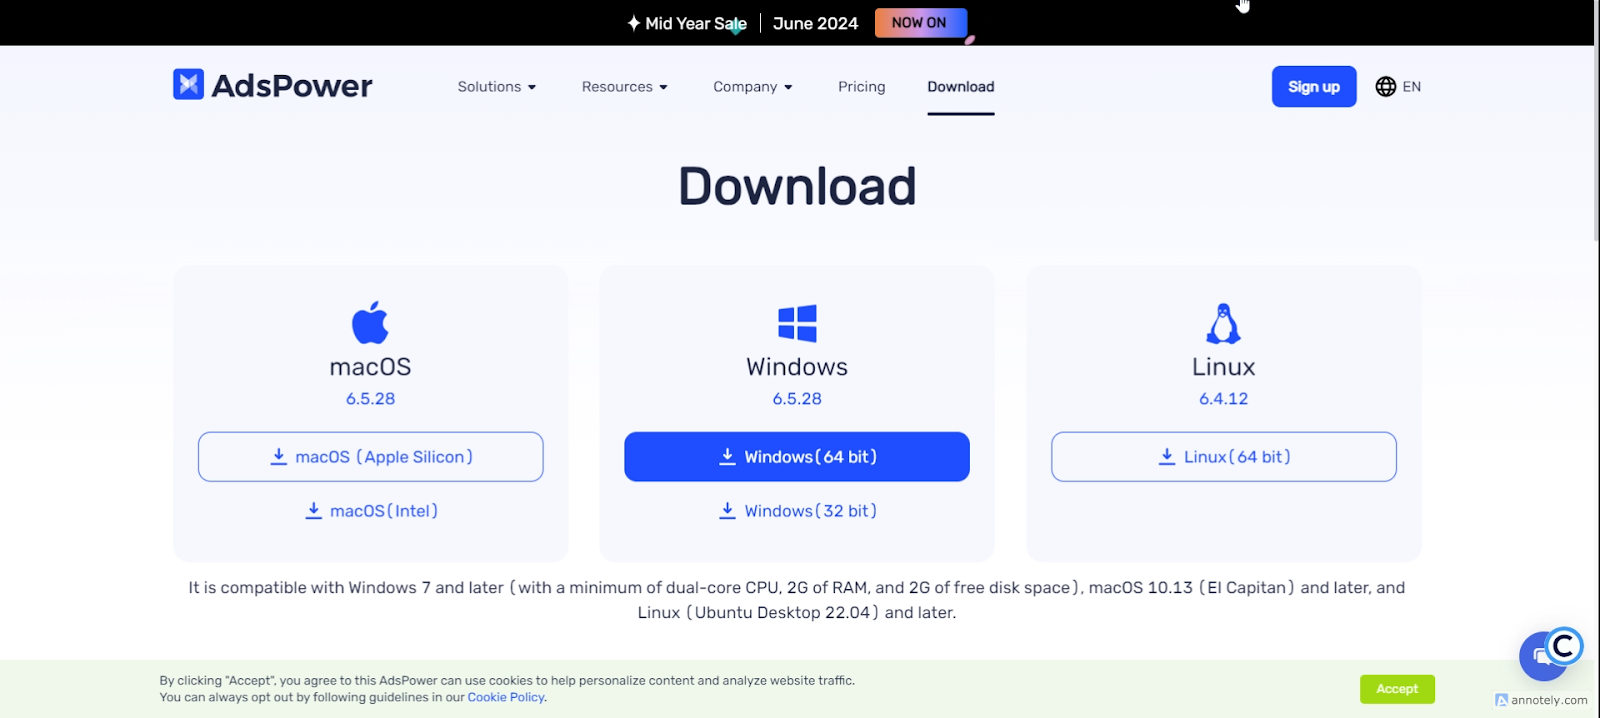
1. Download AdsPower
Visit the tool’s official website and click the Download button to get the tool.
2. Create a new profile on the app
Open the app and click + New Profile to create a personalized profile.

Configure your browser profile by adding your browser profile name, groups, tags, user agent, and cookies.

Click OK to finalize the setup of your browser profile on AdsPower.

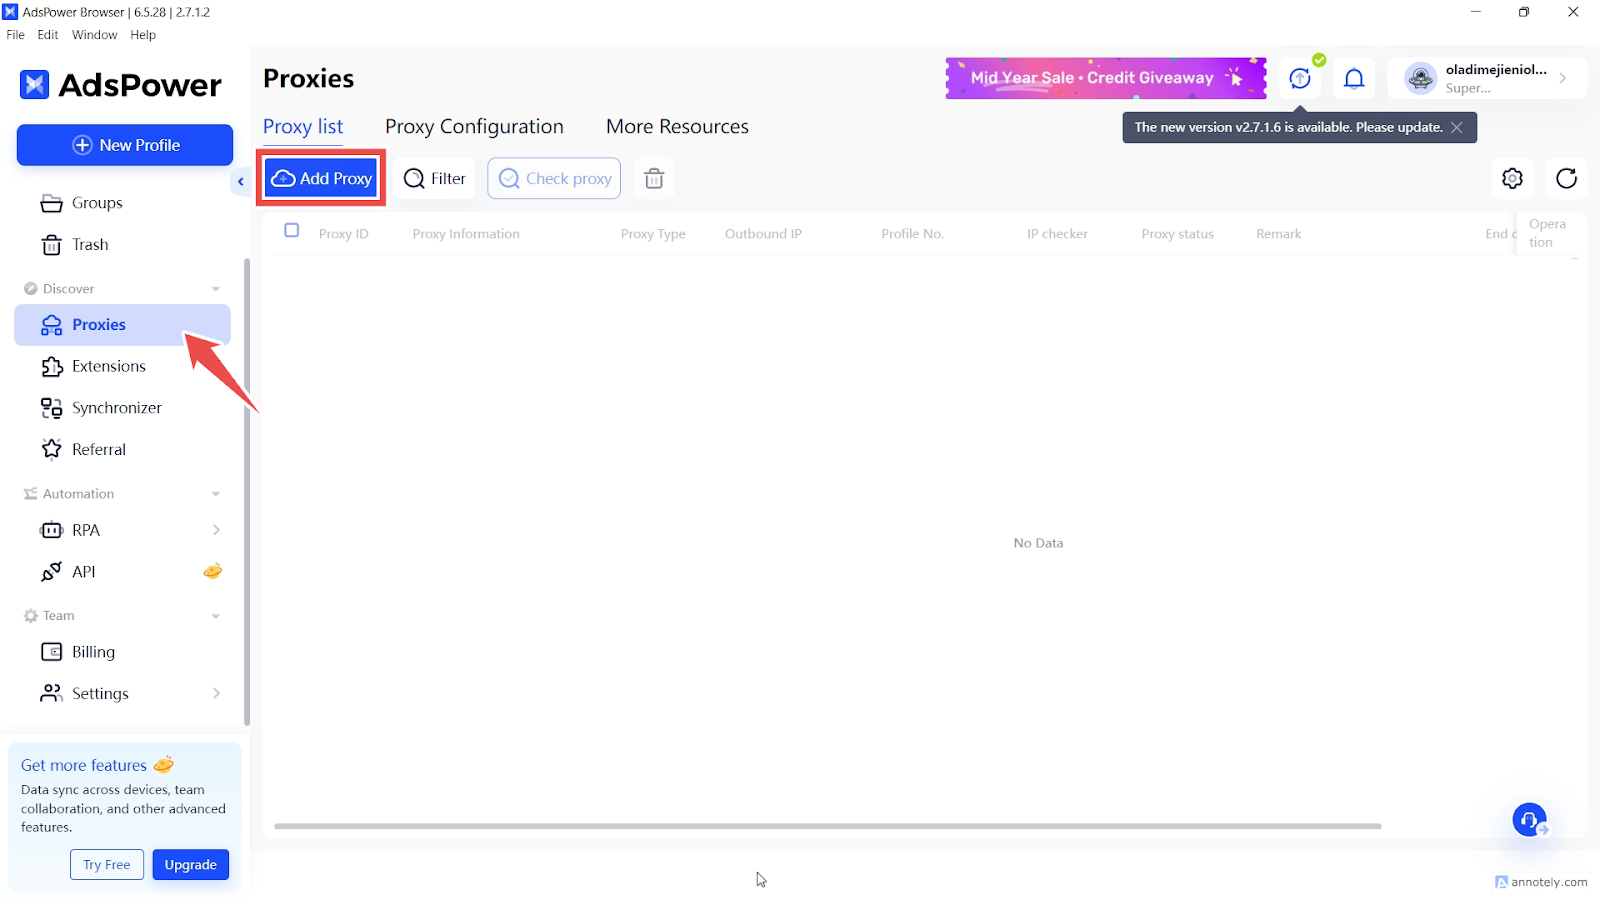
3. Create your proxy
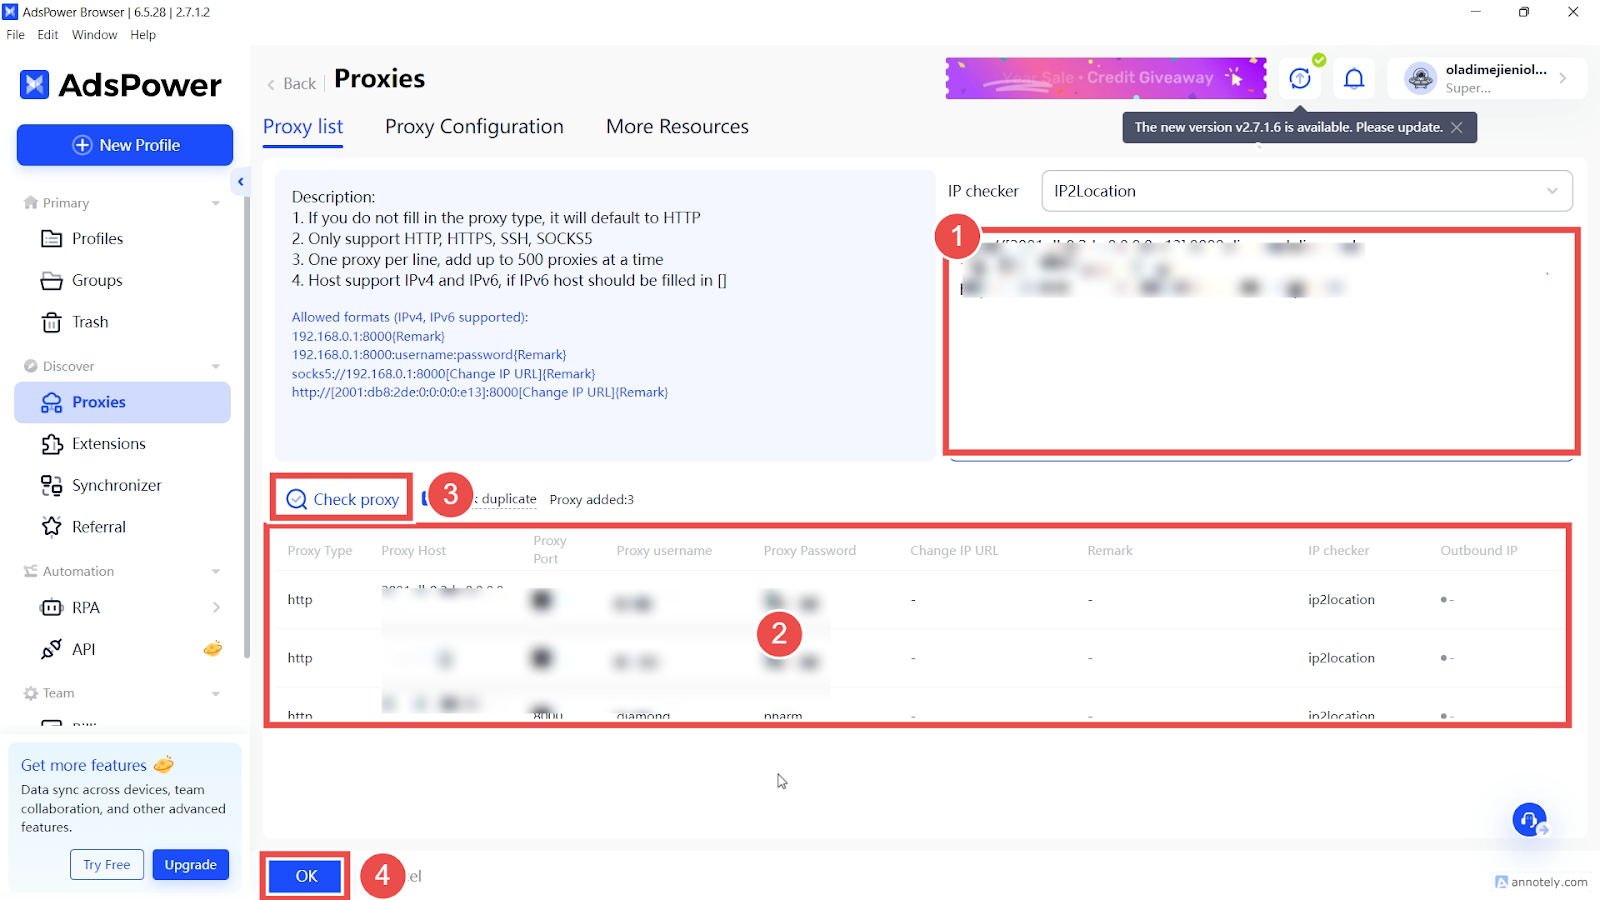
Navigate to Proxies via the sidebar, then click Add Proxy. Next, click Proxy List and fill in the proxy information you obtained from your account’s proxy list. AdsPower only supports the 4 major proxy types, including HTTP, HTTPS, SOCKS5, and SSH.
In addition, you can only input one proxy per line and add up to 500 proxies at a time. To specify which proxies you want to use on AdsPower, you must integrate with rotating or static proxies.
Rotating IP address configuration
For this process, open the proxy setup tab and use the Rotating Proxy Endpoint generator to adjust the country settings on the configuration page. This adjustment grants you access to a country-specific rotating IP address.
Here is a simple format describing the configuration process:
- Proxy type (Internet protocol): HTTP or SOCKS5
- IP/Host: Profile Name (e.g. p.webshare.io)
- Port: Proxy Port field (e.g., 95)
Remember to set the parameters, including authentication method, location, session types, and connection protocol. Also, select the number of proxy endpoints you intend to generate (default 10) and copy the endpoints.
After completing this, click Check Proxy and proceed!
Static IP address configuration
Integrating proxies on AdsPower using static IP addresses is pretty easy as well. First, open the proxy setup tab and navigate to the Endpoint generator to obtain your account’s information.
Next, you can configure the parameters according to your needs. You can follow this format:
- Proxy type: HTTP or SOCKS5.
- IP/Host: Proxy address number (e.g., 198.172.338.798)
- Port: Specific number (e.g. 2000)
Ensure you enter your information for the authentication method and choose a session type. Upon completing the process, click Check Proxy to see if you are connected.
4. Launch the browser profile
After following the above steps, launch your profile and finalize your proxy configuration process. To do this, click Open under Tags.

How to setup batch proxies on AdsPower
Understanding how to configure batch or bulk proxies is a must, especially if you want to use or manage multiple profiles in different sessions. With a batch proxy setup, you can easily access your multiple profiles.
The process for adding bulk proxies on AdsPower is similar to setting up single proxies.
1. Get Your Proxies: Your proxies should be listed in a .csv or .txt file. As a Webshare user, you can easily download your configuration by visiting your account’s Proxy list page and clicking the Download button. Open the text file, copy its content, and proceed to the following step.
2. Add Proxy Details: Paste the copied text file contents directly into the textbox as you did during the single proxy configuration. As previously mentioned, ensure you add one proxy per line. Rest assured, you can add up to 500 lines.
The proxy table should populate with your proxies, resembling this format if you use a basic setup: http:197.168.1.1:8181:username: username or socks://192.168.1.1:7777.
Notably, not including a proxy type automatically sets your connection to HTTP.
3. Run a Quick Check: You can quickly check the connection status of your proxies by clicking Check Proxy. Finalize the process by clicking OK to save your proxies.
There you have it! You have successfully integrated proxies on AdsPower. Now, it’s time to customize your browser settings for enhanced privacy, depending on your project needs. Remember to take advantage of Webshare’s generous offer—each new account created comes with 10 free proxies.
The best part? You don’t need credit card information or a coupon code to enjoy this offer. Join in and make the most of this offer!


