


OnlyFans has become a very popular platform for adult creators intending to provide extra content for their fanbase. However, the style of content prevalent on the platform might encourage you to hide your IP information when browsing it. If you’re looking for a way to support your favorite creator while remaining anonymous, you might want to try using a proxy service. Here’s how you can set up and use a proxy for OnlyFans.
Before starting: Get free proxies for OnlyFans
The solutions mentioned below require a proxy. If you don’t have any, no worries. By just creating an account on Webshare right now, you can get 10 free proxies. You don’t need to enter any payment information to enjoy this reward—it’s free!
If you’re interested, head to the Webshare website and create an account; the free proxies will immediately become available.
Easiest method: OnlyFans proxy for Chrome
Proxies are a big part of web services, and avenues to use them have been created on various platforms. However, starting with the most convenient solution would make the most sense. So, let’s consider how to use a proxy on your Chrome browser.
Step 1: Setup the Proxy
First, you’ll want to launch your Chrome browser. On a free tab, navigate to the Chrome extension page on the Webshare website. From here, it’ll be easy to download and install the Webshare Chrome extension to manage and connect to proxies.
If you don’t have a Webshare account yet, go ahead and create one. Once you do, look for the Add Extension for Free button on the bottom left side of the page.

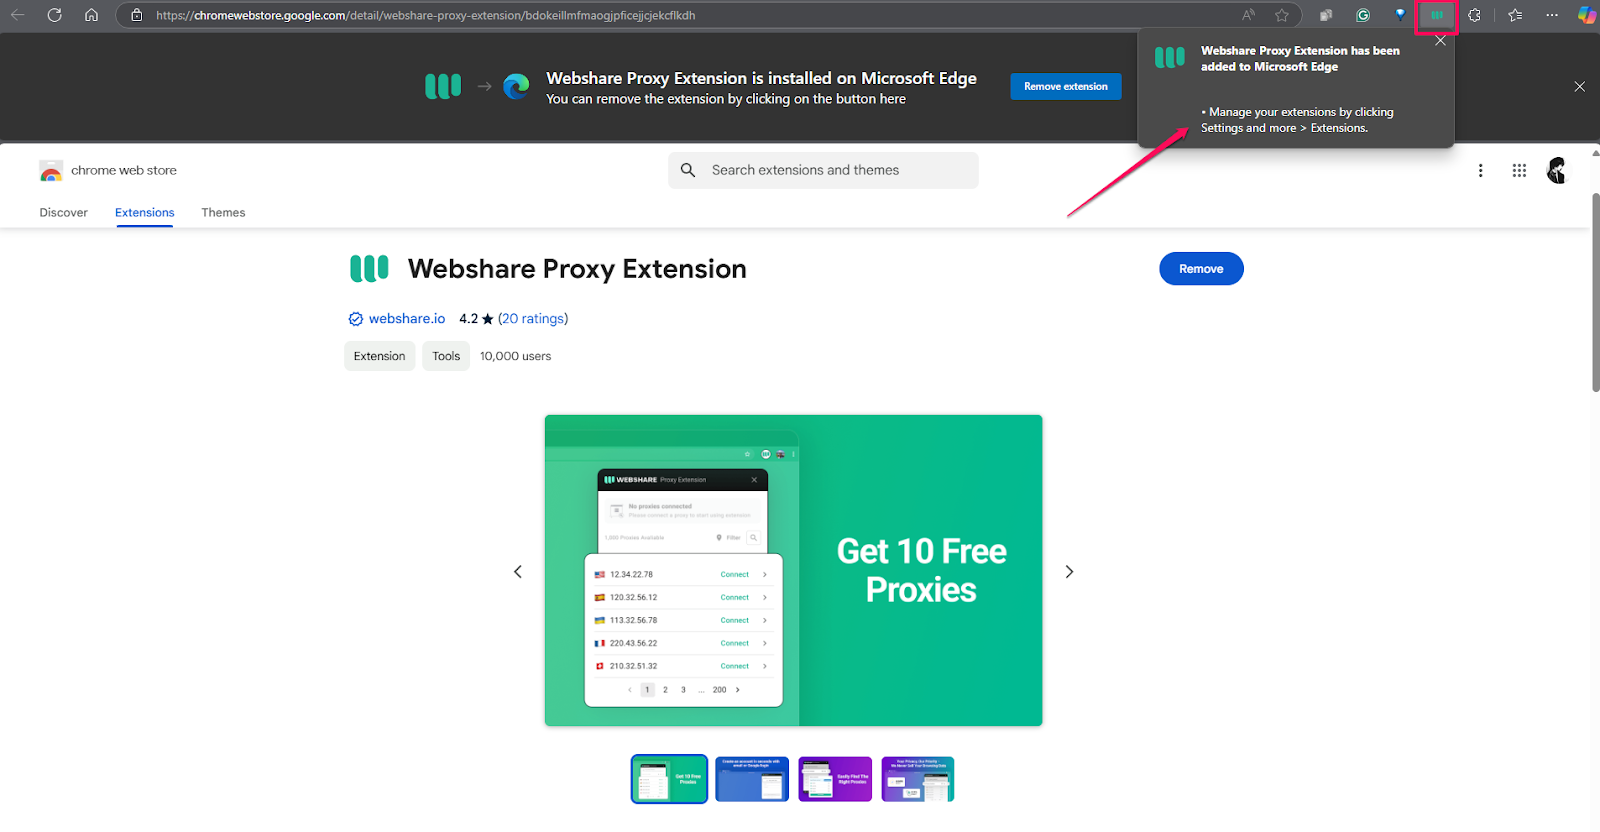
Once you’ve done this, you’ll immediately be redirected to the Chrome web store. This is where all Chrome extensions and add-ons are installed. Specifically, you’ll land on the Webshare Proxy Extension page on the web store.
Keep your eyes on the top right corner of the screen, and you should notice a Get button. Go ahead and select it to begin installing the Webshare extension.

Selecting this option will initiate the installation process. This will trigger a pop-up showing you all the permissions Webshare requires for the extension to work as needed.
Be sure to read through this short list, ensuring you understand this before installing. Once you’re ready to install, select the Add extension button at the bottom of the popup window. It should be highlighted in grey.

After confirming the installation, you should notice a download notification pop-up in the top left corner of your screen. The file isn’t large and should finish downloading within a few seconds.
Once this download has been completed, the Webshare extension will be installed on your browser. You’ll know it's done when you notice the logo pulse to life on your address bar.
Step 2: Connect to Proxy
Congrats, you’ve successfully installed Webshare! However, this is only the first step in connecting to OnlyFans with a Proxy. Now that you have a viable list of proxies, the next natural step is to use them, and here’s how.
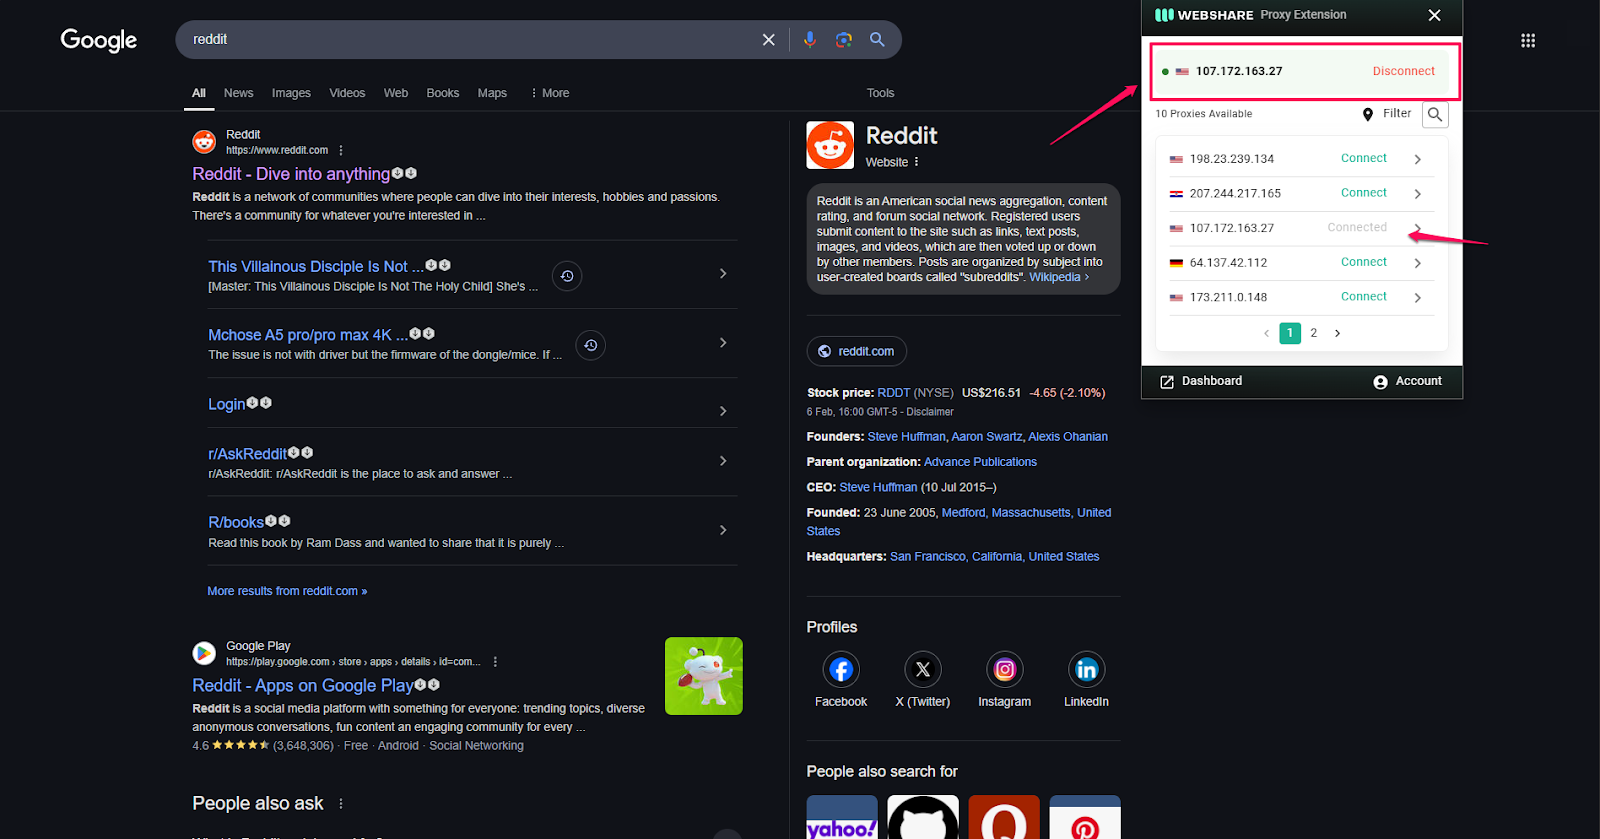
Look for the Webshare icon on the far right of your address bar. If you have other extensions installed, you might have to look in your extensions list. Once you do, click the icon. A menu should appear in your browser window.
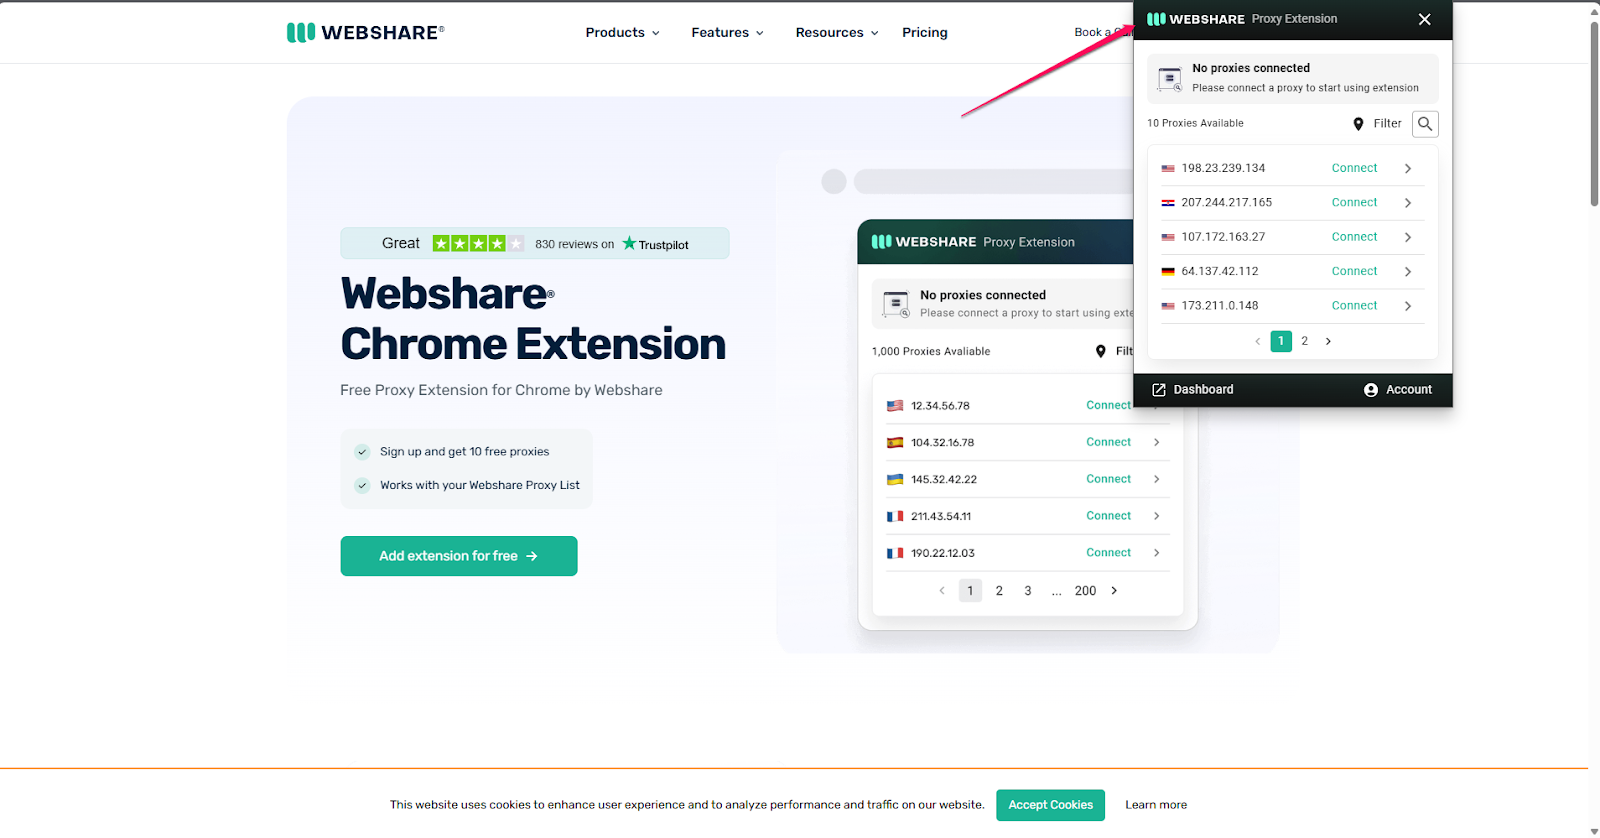
With your Webshare account set up and the proxy manager extension installed, you should notice the ten free proxies with your account. There’s a diverse selection of countries to choose from, but it helps to pick one near you.
You can navigate the selection using the dial at the bottom of the menu. Once you’ve decided on a proxy you’d like to use, select the Connect button beside it.
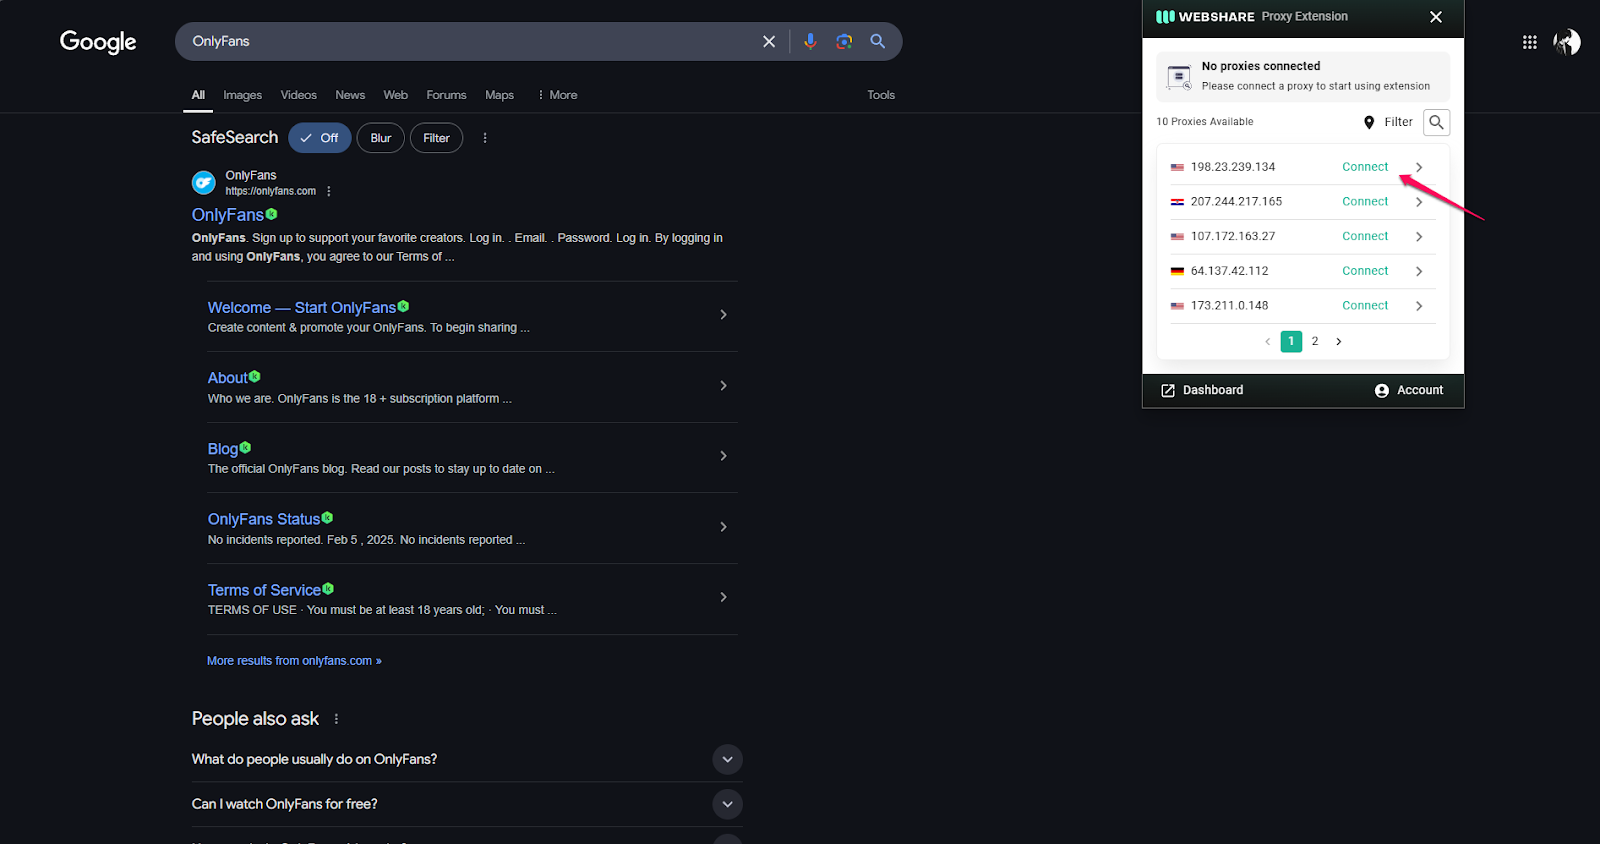
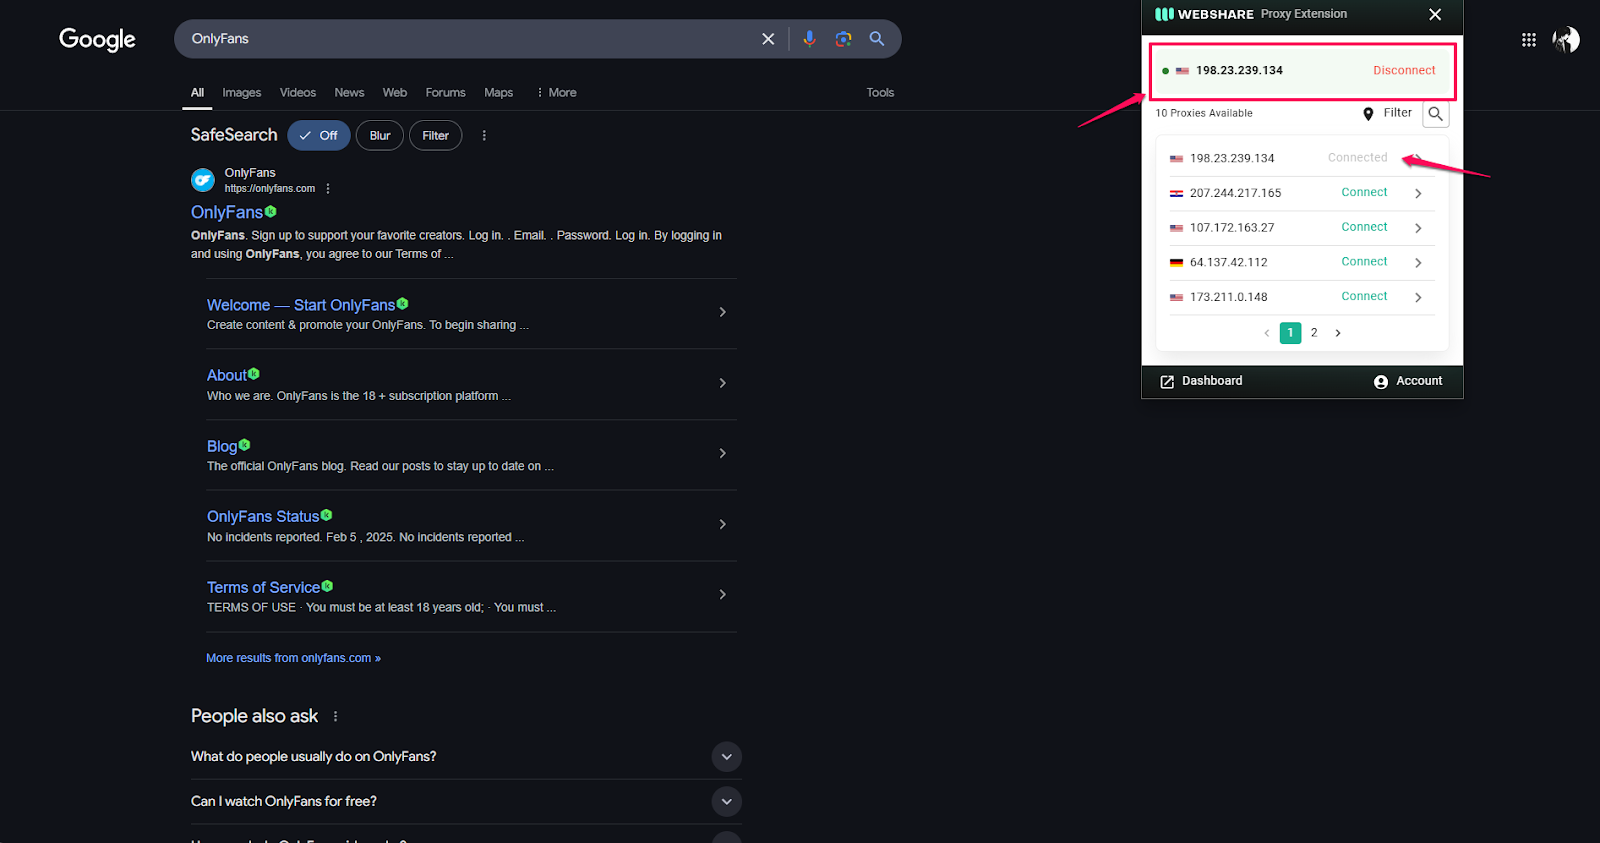
The connection process should be fairly instant, and you’ll know you’re connected when it says so, as well as the proxy you’ve chosen.
You can also tell by the small alert that appears at the top of the drop-down menu, showcasing the proxy address you’re connected to with a small Disconnect button.
Step 3: Go to OnlyFans Website
For this step to work, it’s important that you successfully connect to your chosen proxy. If you haven’t been able to do so yet, go over the previous steps gradually, taking your time with each task. If you are connected, then it’s time to dive into OnlyFans.
First, you want to navigate to the OnlyFans website. You might have this favorited, or you could use a search engine to find a link that directs you there.

With your proxy working in the background, you can create a new, anonymous account on OnlyFans. Now, you can subscribe to your favorite creators without fear of exposure and freedom from judgment.

OnlyFans Proxy for Windows
Now that we’ve covered the most obvious approach to securing your session when browsing on OnlyFans let’s talk about other possible solutions. If you own a Windows PC, then you can actually connect to a proxy on your device, and here’s how.
Step 1: Secure Your Proxy Details
To use a Webshare proxy on your Windows device, you’ll need all of the information related to the IP address. You can retrieve this by going to the Proxy List on your Webshare dashboard.
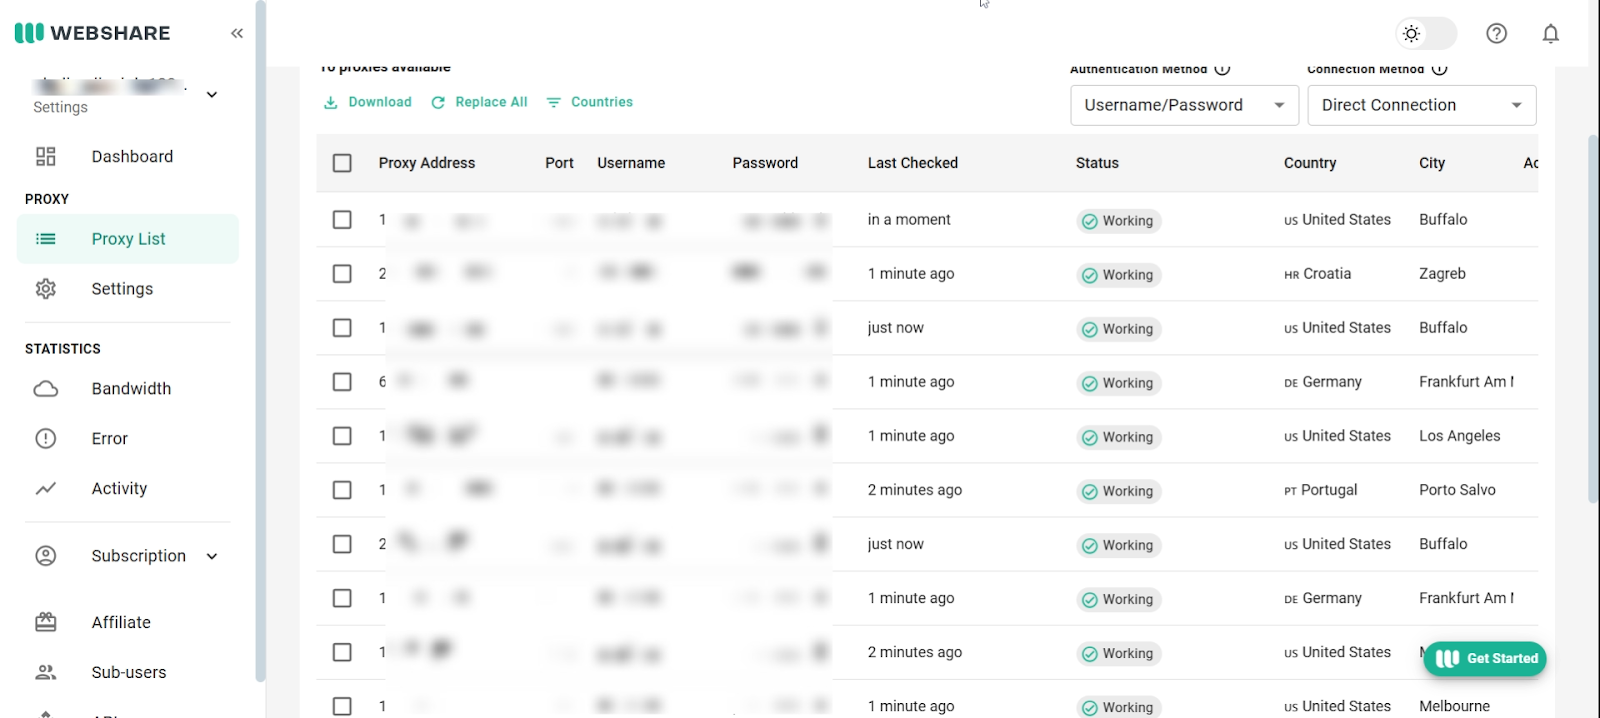
You could write it down or copy it into a notepad window on your computer.
Step 2: Manually Connect to Proxy
There are two ways to do this on Windows. The first is the automatic proxy setup, and the other is manual. For this, we’re concerned with the manual method.
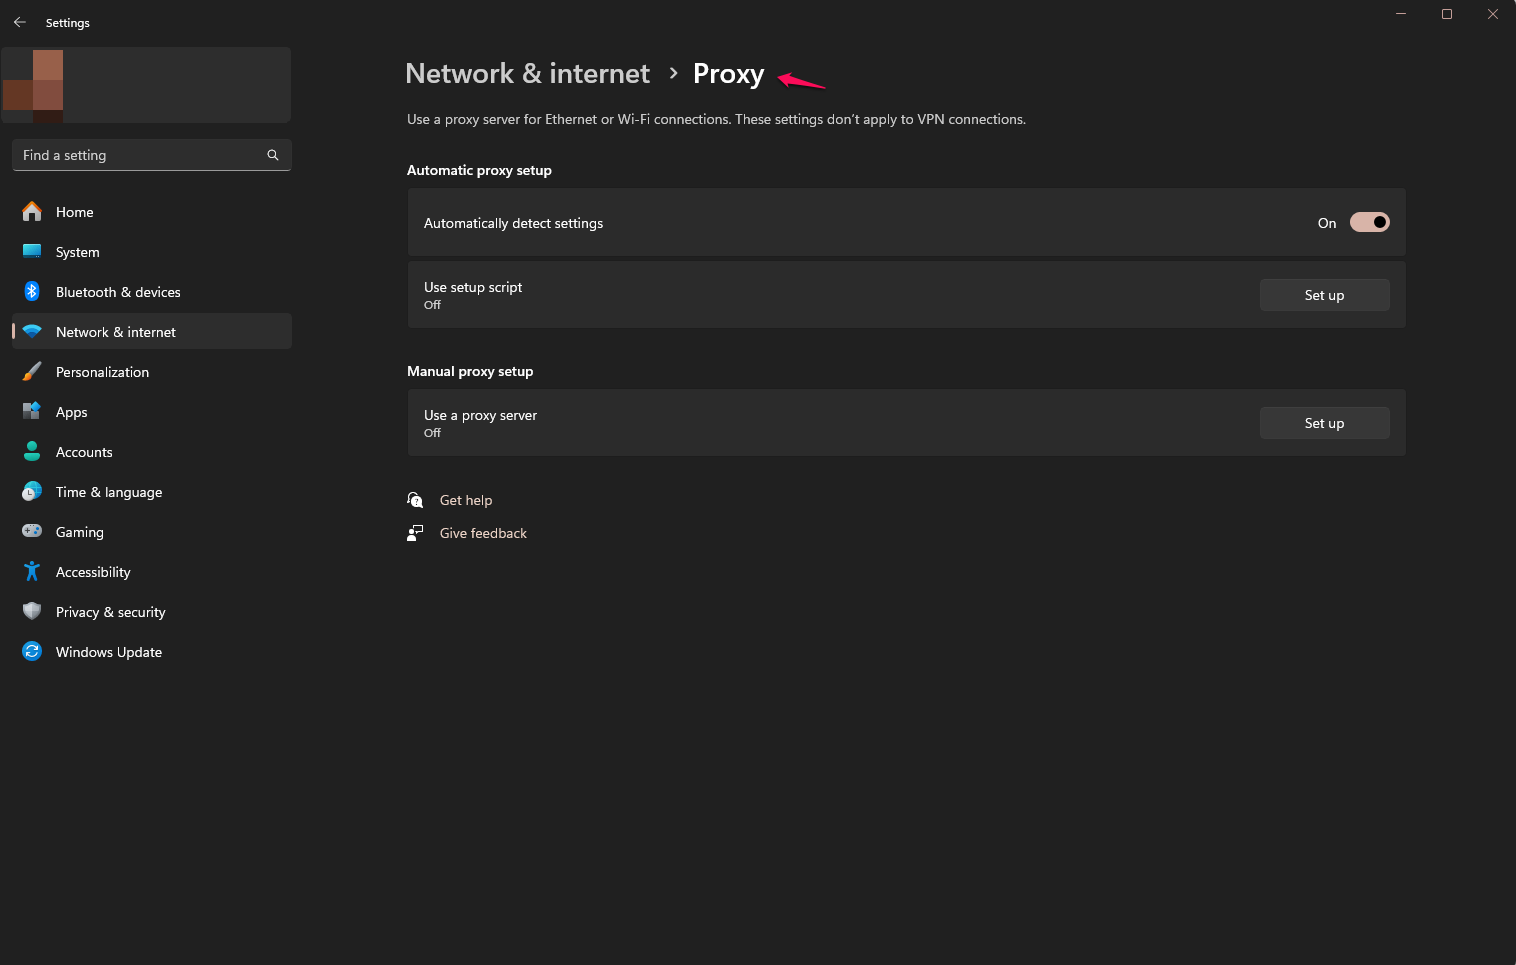
Once you’re in the proxy settings, you’ll notice the Manual proxy setup tab just below the Automatic one. Go ahead and click the Set up button.
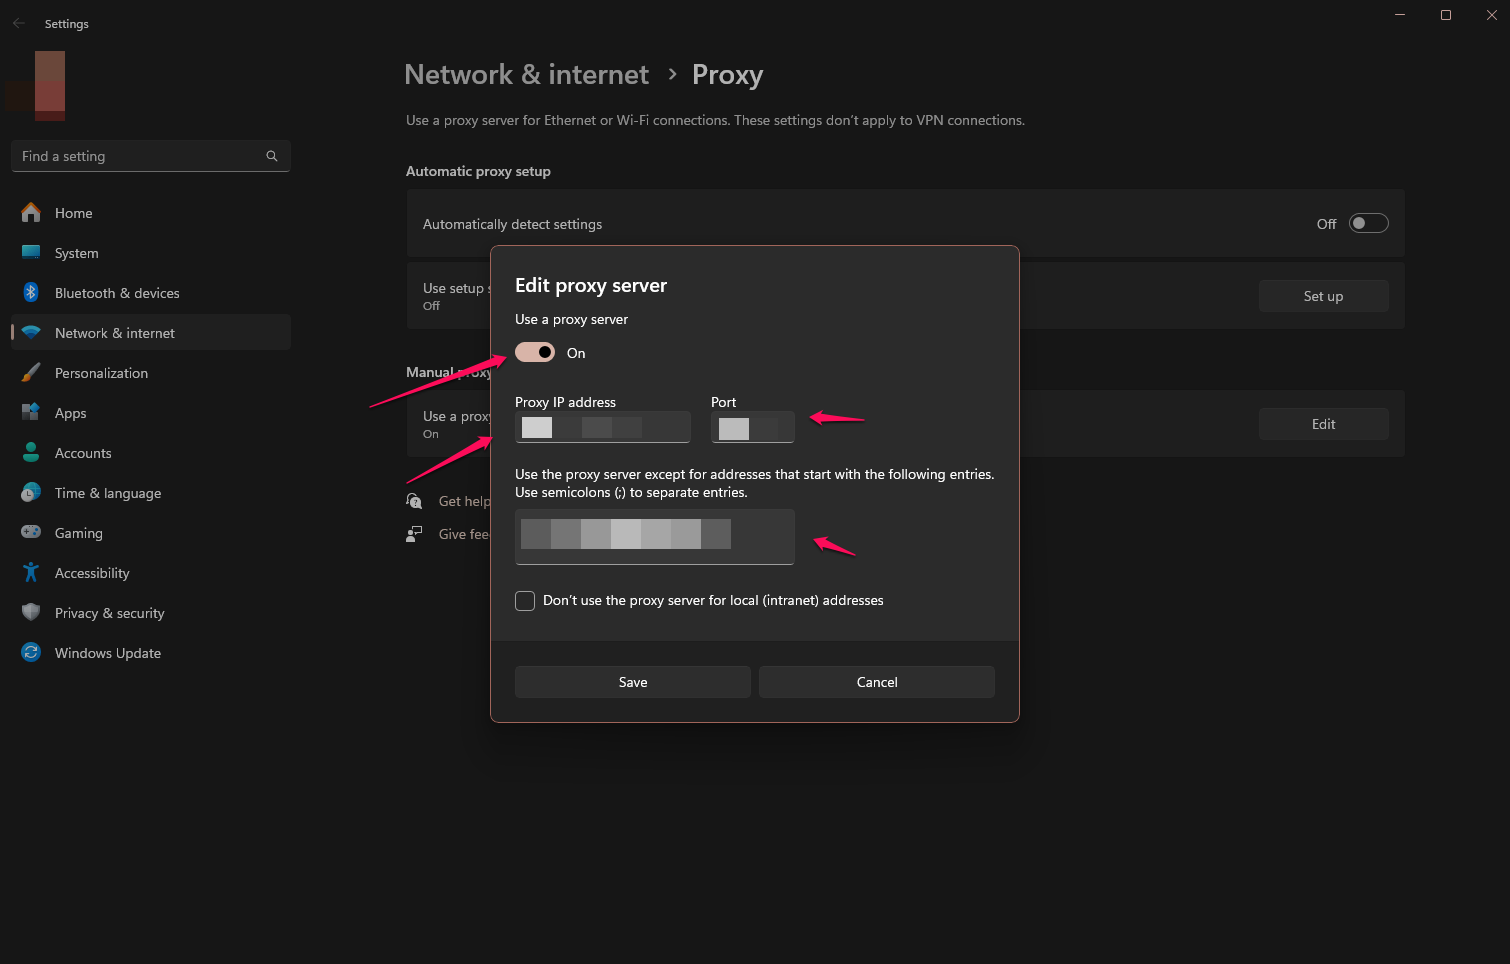
This will trigger a small popup window in which you can enter all the details previously saved from the Webshare proxy list page.
Confirm the Port IP address and Port and exclusions list information you enter before pressing save. Also, confirm that the Use a proxy server toggle is on.
After saving this information, you’ll be all set to use your Webshare proxy on OnlyFans.
You might also be asked to input the username and password of your selected proxy. Thankfully, you can also obtain this from your proxy list on the Webshare dashboard.
OnlyFans Proxy for Android
Using a proxy can help you access OnlyFans securely and privately on your Android device. The steps may vary slightly depending on your phone, but the general process remains the same. Here’s what you need to know:
Step 1: Open Your Wi-Fi Settings
Go to your device's Settings app and navigate to Wi-Fi or Network Settings (this may be labeled differently on some devices).

Tap on your connected Wi-Fi network to access its Advanced Settings.

Step 2: Configure Your Proxy
In the Advanced Settings menu, locate the Proxy option. Select Manual Setup, which will open a menu asking for your proxy details.

Enter the proxy server address and port number—these can usually be found in your Webshare dashboard.
Step 3: Authenticate Your Proxy
After entering the proxy details, you may be prompted to input a username and password for authentication. This ensures that only authorized users can access the proxy service.
Again, retrieve your credentials from your Webshare dashboard and complete the setup. Once configured, your connection will route through the proxy, allowing you to browse OnlyFans securely and without restrictions.
How to Test an OnlyFans Proxy
If you’ve followed all the steps mentioned above to the letter, then you should be safely connected to your free Webshare proxy, allowing you to browse safely on OnlyFans. However, how can you be certain that you’re really connected?
Well, the first obvious sign would be that you’re prompted to log into the service after switching on your proxy. From here, you’ll be able to make a new account tied to that IP address, one that is less connected to you.
You should also pay attention to some of the other signs mentioned in the walkthrough above, like the indicators on your Webshare proxy extension.
How to Turn Off OnlyFans Proxy
It’s been established in the previous sections that you can safely use OnlyFans once you’ve confirmed your connection to a proxy address. If you’re done supporting your favorite creator and want to continue using your browser as usual, then here’s how to disconnect from the proxy.
For Chrome
If you connect to the proxy using the Chrome tab, you can also easily disconnect. A disconnect button appears beside your chosen IP whenever you select a proxy in the dropdown menu. If you’d like to stop your connection, then go ahead and select the disconnect button. It’s that simple.
For Windows
The manual and automatic proxy connection methods for Windows have confirmation toggles that tell your device you’d like to use the entered details. Go ahead and toggle both of them off, and you’ll be back to browsing as usual.
What is the best proxy to use with OnlyFans?
If you’re looking for an efficient proxy to use with OnlyFans, look no further than static residential proxies, since they provide the highest level of privacy and reliable connection.
Conclusion
OnlyFans has helped many individuals strike out and build a strong brand with the help of their loyal fans. If you happen to be one of those fans, then wanting to safely and freely navigate the platform is only natural. With the use of a proxy, you can do just that. Just be sure to follow the steps listed above, and you’ll have no trouble while on OnlyFans.


