


Few people acknowledge that Snapchat isn’t as flexible as it seems. Although it is a fun way to connect, what happens when it’s inaccessible due to network restrictions, school or workplace firewalls, or regional bans? Additionally, managing multiple accounts can be stressful without a seamless switching method.
This is where a proxy comes in. A proxy routes your connection through a different server, allowing you to bypass restrictions and even improve loading speeds. Although setting one up can be a bit tricky, we've got you. Our guide comprehensively discusses everything you need to know about using a proxy with Snapchat effectively.
Before Starting
The quality of your chosen proxy directly impacts your ability to bypass geo-restrictions, protect your privacy, and even manage multiple accounts on Snapchat.
One of the most user-friendly options is Webshare, which offers 10 free proxies to new users upon signing up. And guess what? No credit card information is required. Getting started is simple. Visit the Webshare website, create your account, and instantly get your proxy details. Once you have them, the next step is configuring the proxy on your device.
Whether you're using Snapchat on Chrome, Windows, or Android, you can expect a smooth and hassle-free experience.
Easiest Method: Snapchat Proxy for Chrome
A browser extension is the most efficient approach to accessing Snapchat for Web on Chrome through a proxy. One of the best solutions available is the Webshare Chrome extension, which seamlessly integrates proxy settings directly into your browser. With minimal effort, you can establish a secure and unrestricted connection.
To set this up, follow the steps below:
Step 1: Get the Webshare Chrome Extension
Visit the Chrome Web Store and look up the Webshare extension. Click Add to Chrome, and when prompted, approve the installation by clicking Add Extension.

Step 2: Access the Extension and Set Up Your Account
Notably, the extension may not appear right after a successful installation in your browser’s toolbar. That’s fine. Simply click on the puzzle-shaped Extensions icon in the top-right corner of Chrome. Then, locate Webshare and click the pin icon to keep it easily accessible.
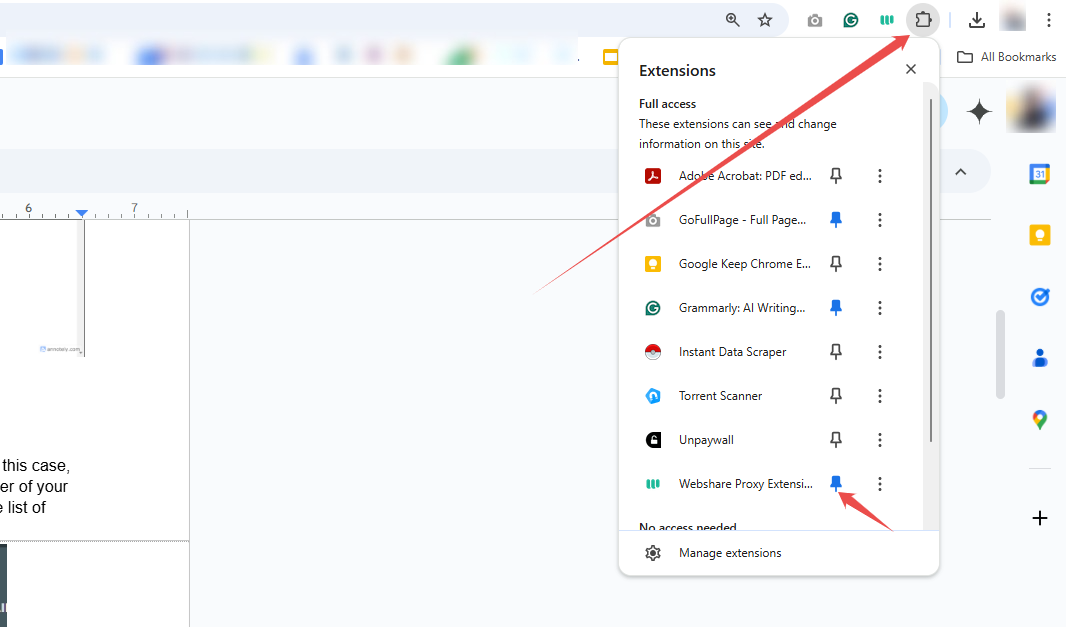
Once you pin the extension, click on the Webshare logo to continue. If you already have an account, log in with your credentials.
As a new user, you must select Create Account to sign up. You can register using your email and password or opt for a quicker setup by linking your Google account.
Step 3: Select and Connect to a Proxy in Webshare
After logging in, you may notice a message stating, “No proxies connected.” This simply means you have not chosen a proxy yet, and there’s nothing to worry about. As a new user, remember you automatically receive 10 free proxies upon signup.
Now, you can establish a connection by selecting from the initial proxies that appear and clicking the Connect button next to your preferred IP address. Each proxy has a country flag, making it easier to identify its location and choose one that best suits your needs.
If you require a specific region for better performance or access to Snapchat in a particular country, this feature helps you narrow down your options efficiently.

Alternatively, you can click on the Dashboard to explore the complete list of the available proxies and select one that best suits your needs.
Step 4: Manage Connections and Access Snapchat
Webshare gives you complete control over your proxy settings, allowing you to filter proxies by country or IP address to find the best connection for your needs. This feature is handy if you’re trying to access Snapchat from a restricted location or need a faster, more stable connection.
Once your proxy is connected, log into your Snapchat account as you normally would. Your connection will now be routed through the selected proxy, allowing you to send Snaps, chats, and browse without limitations.

Snapchat Proxy for Windows
The setup process varies slightly if you need the proxy to work across different browsers. You can adjust your Windows settings to ensure it applies to all your web activity.
Here’s how to get started:
Step 1: Open Proxy Settings in Windows
Launch the Windows search bar and type Proxy Settings. Click Open from the search bar results to navigate to your system’s network configuration page. Here, you will find options for both automatic and manual proxy setups.
Step 2: Manually Configure the Proxy With Your Webshare Details
It is best to switch off Automatically detect settings to take full control of your connection. Next, scroll to the Manual Proxy Setup section and enable the toggle for manual configuration. This allows you to input your Webshare proxy details.

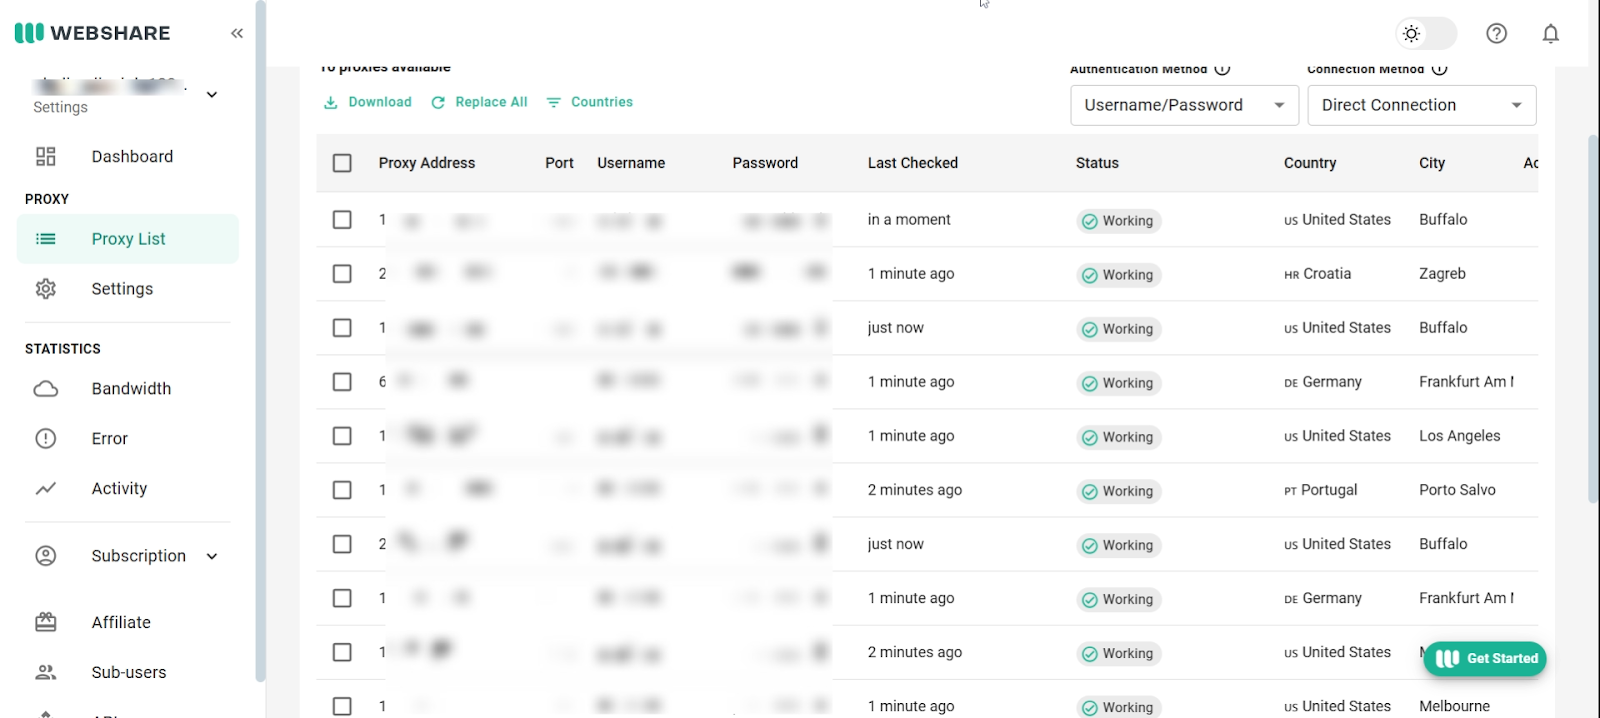
Before proceeding, revisit your Webshare dashboard to view the complete list of proxies and choose an option that best suits you. Each proxy entry includes an IP address, port number, username, and password.
After selecting a suitable proxy, return to your Windows proxy settings, enter the required details in their fields, and double-check for accuracy.

Finally, tick the confirmation box and hit Save to apply the changes. Your system will now route all internet traffic through the selected proxy.
Step 3: Confirm Your Proxy Connection
The most reliable way to confirm that your proxy is working with Snapchat is to test it directly on the app. Try accessing location-based features, viewing region-restricted content, or sending snaps. If everything works smoothly without errors, your proxy is successfully connected.
Alternatively, you can verify your connection by checking your IP address. Simply open a browser and search “What is my IP address?” If the displayed IP matches the one assigned by your Webshare proxy, your connection is set up correctly.
Snapchat Proxy for Android Instructions
Android devices come with slightly different interfaces; however, the steps to configure a proxy are generally the same across most models. Here is how to get set up:
Step 1: Open Your Wi-Fi Settings
Open your device’s Settings app and head to the Wi-Fi section. Connect to your preferred network and tap the gear icon or Advanced settings option.

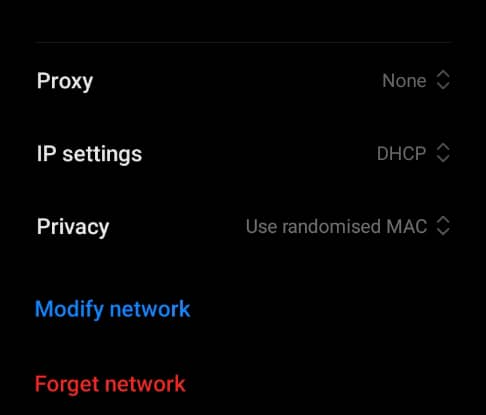
This will bring up additional options, including Proxy, IP settings, and Privacy settings, as shown below.
Step 2: Manually Configure the Proxy
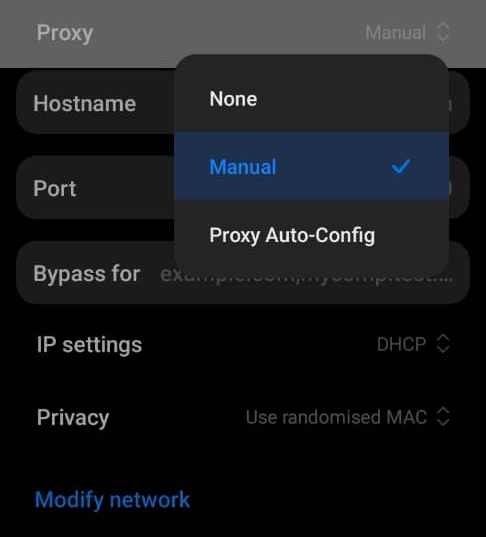
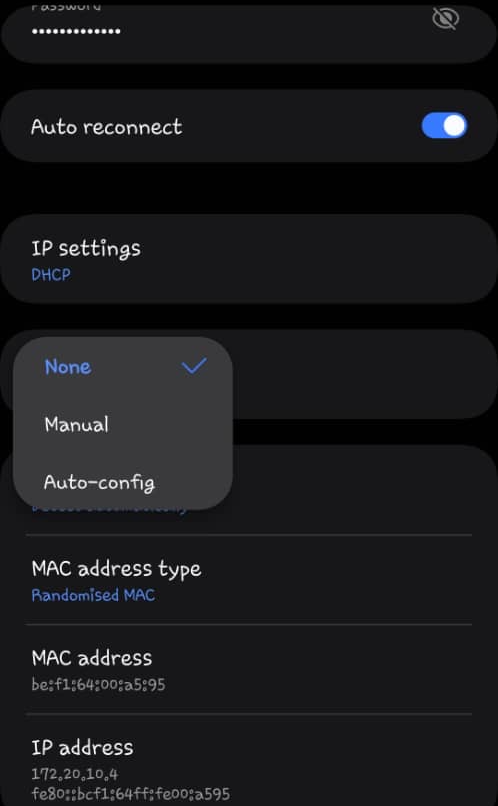
Within the Advanced Settings, also known as Additional Settings on some Android models, locate the Proxy option. Select Manual from the three options you get after tapping the drop-down menu.
Get your proxy credentials from the Proxy List section of your Webshare dashboard. Carefully input the IP address and port number into the respective fields, ensuring accuracy before proceeding.

Step 3: Verify Your Proxy and Open Snapchat
After entering your proxy details, you will be prompted to verify your connection. Webshare provides two authentication methods: Username/Password Verification and IP Whitelisting.
For the former, you need to retrieve your assigned login credentials from the Proxy List in Webshare and input them when prompted. The latter is a more seamless method because instead of entering login credentials manually, you can whitelist your device’s IP address in your Webshare settings.
Once whitelisted, the system will automatically recognize your device and grant access. At this point, it means your proxy is fully active, and you can now browse Snapchat without restrictions.
How to Test Snapchat Proxy
Setting up a proxy is only half the job; verifying it works correctly is just as important. Not all internet traffic automatically routes through the proxy, so you must confirm that Snapchat recognizes your new connection and that the proxy functions correctly.
To confirm, head to your browser and visit an IP-checking tool like IPinfo. This will display your IP address, location, and internet service provider (ISP). Compare these details with the proxy information from Webshare. If they match, congratulations, your proxy is successfully connected, and Snapchat will recognize your traffic as coming from the chosen location.
For even better results, clear your browser cache and cookies before logging into Snapchat for Web. This allows it to recognize your new IP address and even manage multiple accounts hassle-free.
How to Turn off Snapchat Proxy
You may decide not to use a proxy while using Snapchat. Disabling the proxy is a simple process, whether for troubleshooting, faster browsing, or switching back to your original network.
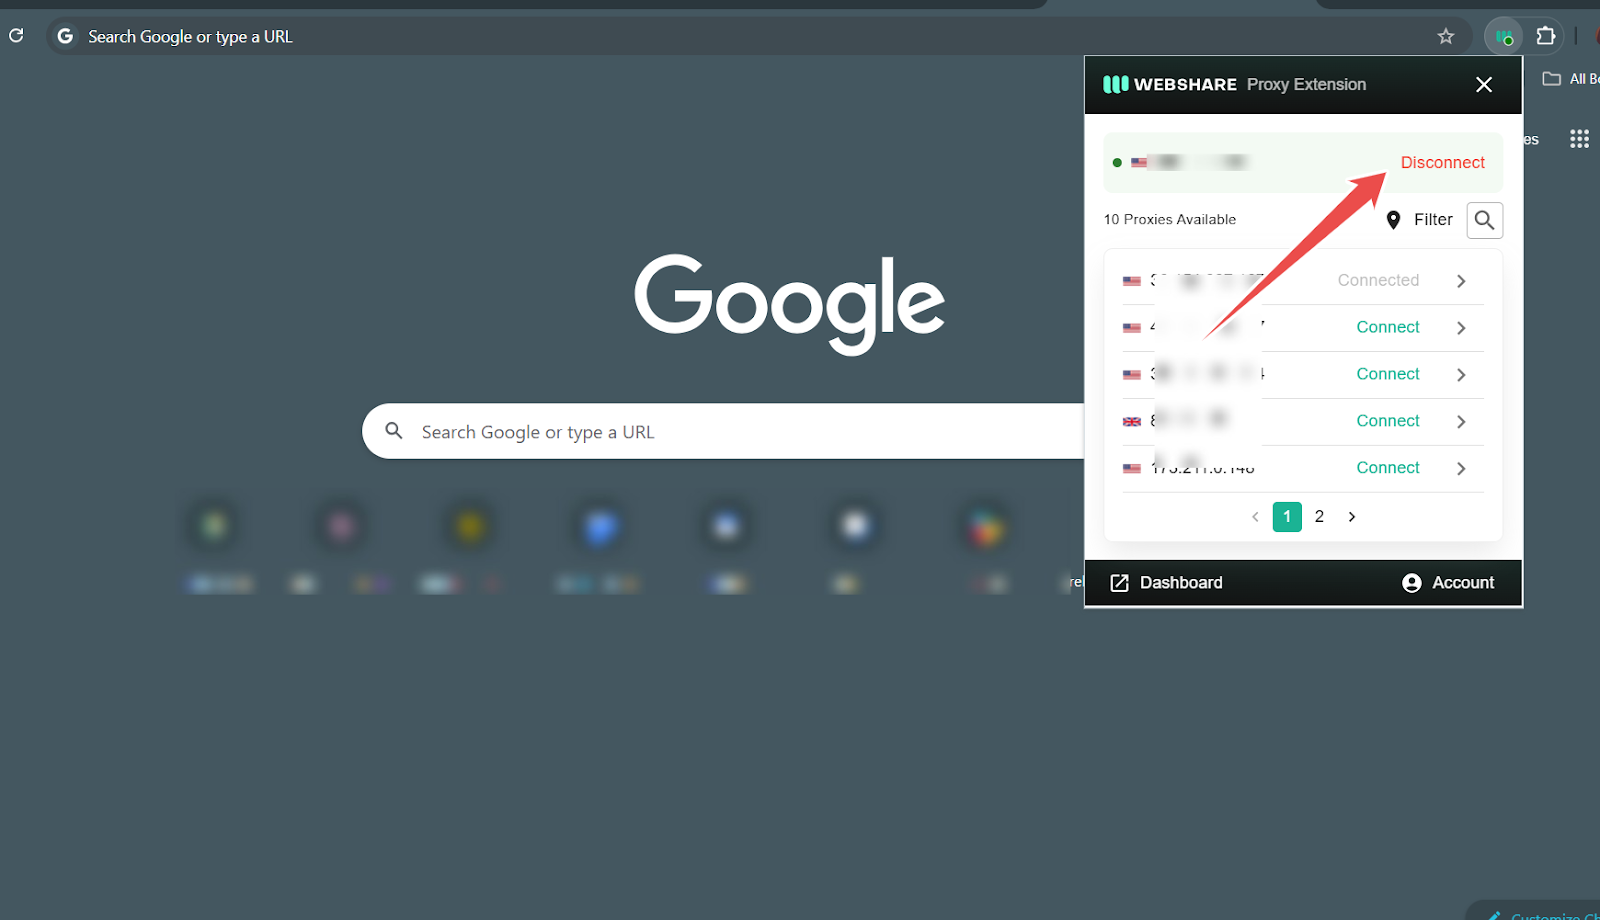
Turning off the Snapchat proxy via Chrome is pretty fast. You only need to click on the Webshare icon in your browser’s toolbar, and you’ll see an option to Disconnect in the pop-up window. A single click will deactivate the proxy and restore your default connection settings, allowing you to use Snapchat without the proxy.
If you are on Windows, you can turn off the proxy manually. To do this, open Settings, navigate to Network & Internet and find the Proxy section. Under Manual Proxy Setup, locate the toggle for "Use a proxy server" and switch it off. Click Save, and your connection will return to its default state.

Lastly, if you want to turn off your Snapchat proxy on Android, open the Settings app and navigate to the Wi-Fi section. Locate your active network and tap the gear icon next to it. From there, go to Advanced or Additional settings and find the Proxy option.
Switch the setting from Manual to None and save the changes. Once done, your device will stop routing traffic through the proxy and return to its standard internet connection, ensuring you can browse Snapchat as usual.
The Bottom Line
Snapchat is a fantastic platform for connecting with friends, sharing moments, and staying engaged with trending content. However, access issues, network restrictions, or privacy concerns can occur.
A reliable proxy service lets you regain full access, bypass restrictions, and maintain online privacy effortlessly. While numerous proxy providers are available, each varying in cost, speed, and reliability, the best proxy for Snapchat depends on your specific needs and budget.
For beginners, Webshare is a stand-out option. It provides 10 free proxies upon signup without requiring any credit card information. With this, you can experiment with different proxy settings and experience the benefits firsthand before deciding if an upgrade is necessary.


