Get 10 Free Proxies For Windows
Many would say proxies are like gateways that protect users from the dark side of the Internet. Think of it this way: you load an internet address, which sends a request through the proxy server to the website. Afterwards, the data from the site is sent back to you using the same path.
There are a lot of benefits that come with using a proxy, including secure browsing, improved security and ability to change your device's geo location. While these are attractive, you need to know how to go about setting the server up. In this article, we’ll provide a step-by-step guide on how to set up a proxy server on your Windows 10 & 11. Jump to whichever section you need:
How to get a proxy server for Windows?
There are online platforms that offer free proxy servers to users who sign up with them. One good example is Webshare (that's us!), which gives 10 free proxies for newly registered users.

What’s more, you don’t even need to provide your credit card details to claim this offer. So, what are you waiting for? Get yours today by clicking here.
How to use a proxy server on Windows?
Here are mainly two ways of setting up a proxy server on Windows (automatic and manual). However, in this section, we’ll provide instructions on how to use the latter:
1. Head to Windows Settings
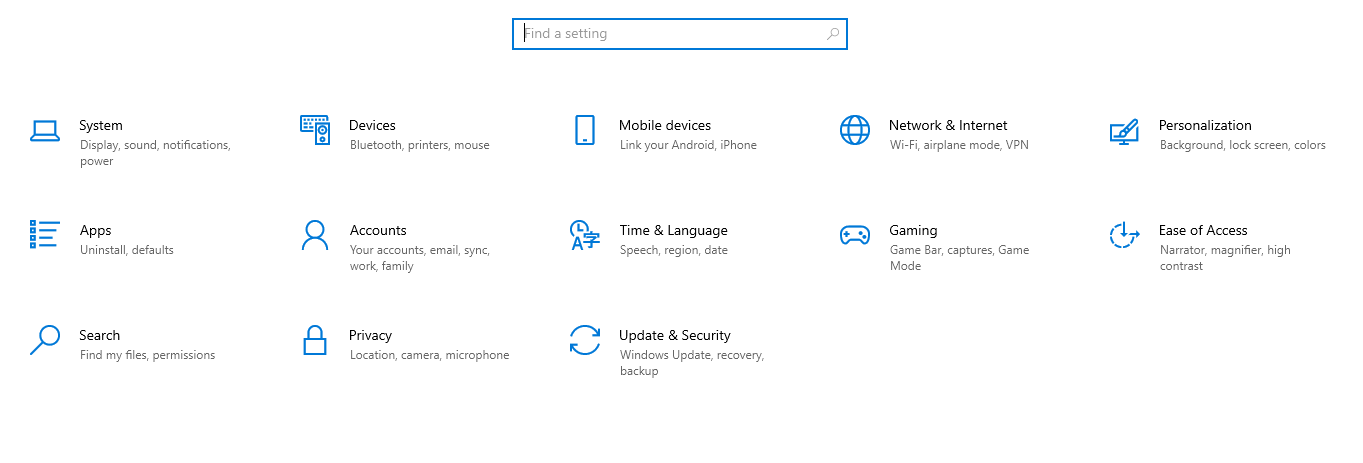
Open your PC and search for Settings using the search bar on the bottom left of your screen. Or as a shortcut, click on the Windows key + I simultaneously.
2. Open the Proxy page

Click on Network and Internet, then select “Proxy” from the menu on the left-hand side. You’ll see two options available: Automatic and Manual. Scroll down to the latter section.
3. Use the Manual proxy setup
While the automatic option is simpler, the manual setup is a bit more technical. Follow this guide below to set it up on your Windows 10 and 11.
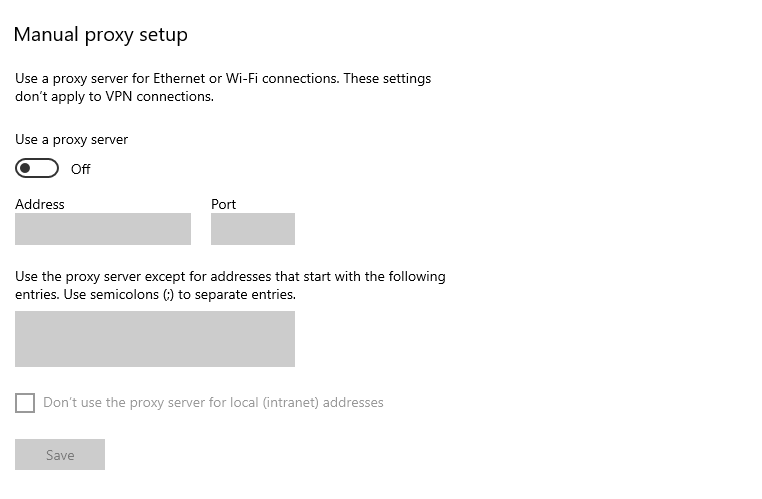
Scroll down on the proxy page and you’ll find the manual settings
Toggle the “Use a proxy server” option ON.
Enter your preferred proxy credentials in the right boxes. For example, you’ll need to input the server address or hostname. Then, enter the port number for the proxy. Note that some servers may require you to enter a username and password.
Click on the “Save” button to complete the process and apply the proxy to your PC.
4. Test proxy connection
After setting up a server on your Windows, it’s important to complete the proxy authentication. There are two ways to go about this, and they include:
Check Your Internet Access
Once you’ve set up your proxy, open your preferred browser and try visiting a website. If the site loads and asks for proxy authentication, enter username and password for your proxy listed in the proxy list dashboard page.
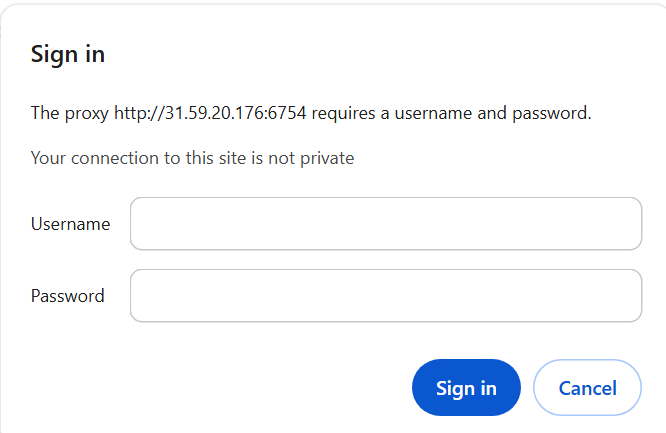
Confirm Proxy with Tool

You can also use online tools like WhatIsMyIP to test the proxy authentication. After loading up the website on your browser, it will automatically load up your proxy credentials, including the local IP, on the screen.
Tip: If you are still having trouble with the proxy and sites are not loading up, try double-checking the server address and port. Make sure there are no mistakes or incorrect proxy credentials.
How to disable Proxy Settings on Windows?
There are times when you don’t need to use a proxy server and need to disable them. You can do so by following this guide below:
- Head to the manual section of the proxy page.
- Click on the toggle to turn it OFF. Once this is done, the address and port field will be deactivated.
- Close the settings window, and your PC will immediately apply the changes.
- Confirm the deactivation by using the WhatIsMyIP online tool.
Advanced proxy configuration pptions
Aside from using the manual option, there are other ways you can set up your proxy server. One of these is by using the Control Panel, which is more advanced. In the following section, we’ll provide the full guide to using this method.
Use proxy on Windows using Control Panel
While most users prefer using the manual setting options, here is the control panel guide for those with the computer know-how:

Enter “Control Panel” in the Windows search bar.
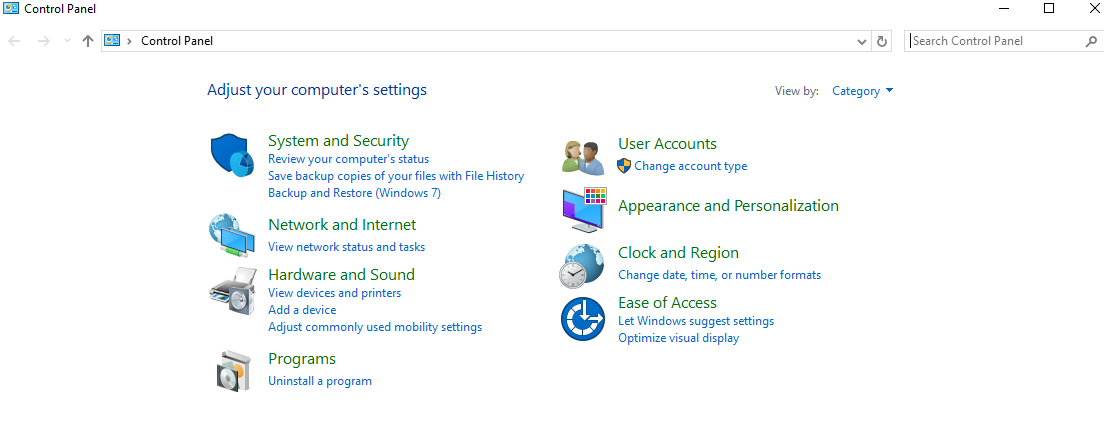
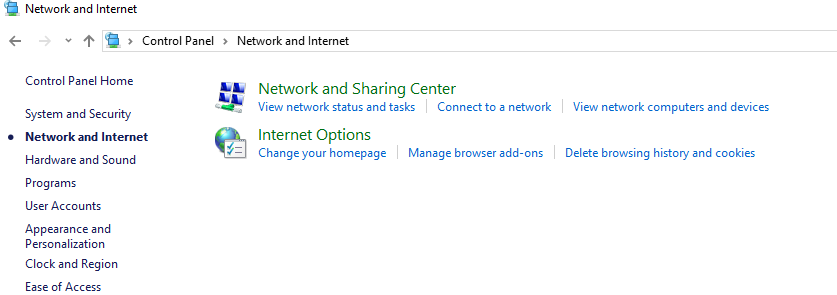
Click on “Network and Internet,” and on the next page, select “Internet Options.”
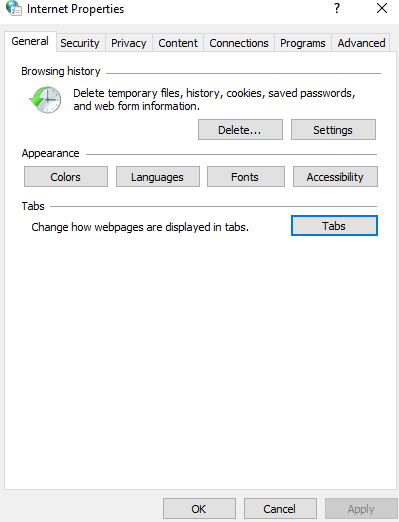
On this pop-up page, click on the “Connections” tab and select the LAN settings button.
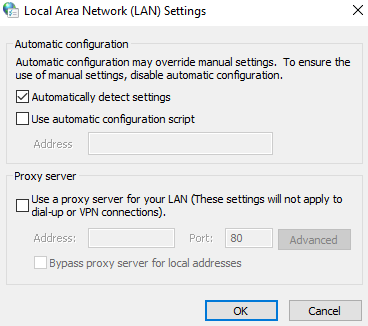
After opening this page, head to the “Proxy Server” section and tick the “Use a proxy server for your LAN” option. This activates the fields where you are to enter the proxy credentials. Finally, click OK to complete the process.
Common Issues and Answers Solved
It’s quite common to run into problems when using proxies on your Windows 10 and 11. Here are a few issues you may face and the answers to them:
Fix Windows Proxy not working
There are a few solutions you can try if your proxy is not working. Try out any of the following:
- Confirm if the proxy server is active, restart your internet connection, and retry.
- Try updating your network adapter drivers on the Device Manager window.
- Reset your network settings with Command Prompt (“netsh winsock reset” and “netsh int ip reset”).
Fix Windows Proxy Settings not saving
If your Windows doesn’t save proxy settings, try any of these solutions:
- Confirm you have administrator options to edit proxy settings.
- Check for viruses on your PC. Look for trusted and effective online tools to use.


